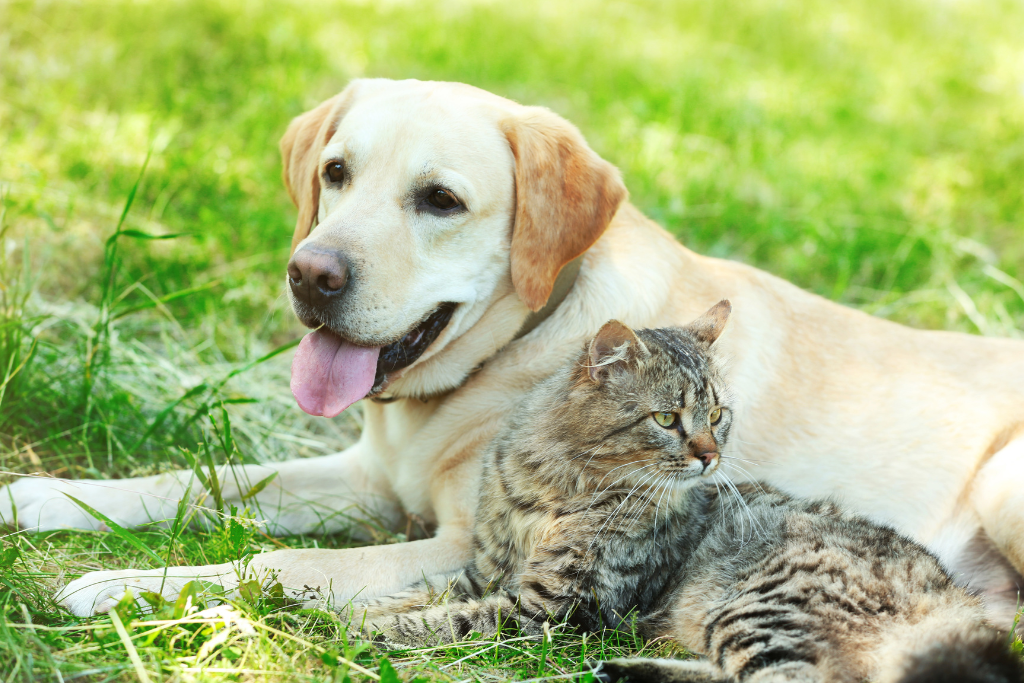
If you’ve ever dealt with seasonal allergies, you know springtime is one of the worst times of year for producing allergens like pollen and dust. But did you know that seasonal allergies can also affect our pets? In this blog, you’ll learn what symptoms to look for and how to help your furry friend if they show signs of allergies.
What Are Seasonal Allergies?
Like us, dogs and cats can experience allergy symptoms during certain times of the year. Seasonal allergies are caused by various things in the environment that the immune system is hypersensitive to. These various things are called allergens, which can cause pets to have an allergic reaction when exposed. The spring (March-May) and fall (September-November) seasons are typically when most pets will be affected by seasonal allergies, but this can vary based on the weather and your location.
Symptoms of Seasonal Allergies in Pets:
Seasonal allergies typically affect pets around their paws, limbs, mouth, ears, abdomen, groin, armpits, tail, and around the eyes. During the spring and fall seasons, keep a close eye on your pet and watch out for these symptoms that may indicate a seasonal allergy:
- Itchiness – Scratching, gnawing, licking, chewing, or digging at the skin
- Skin Lesions – Redness, crusts, black pigmentation or thickening of the skin
- Odor to the Skin or Ears
- Head Shaking
- Pawing at the Eyes, Ears, or Face
- Watery Eyes
- Reverse Sneezing
- Recurring Scooting or Licking of the Anus
- Moist Skin
Seasonal allergies can be diagnosed by your veterinarian through a series of tests that will rule out any other conditions that could be causing similar symptoms. Since many common allergy symptoms can progress into more serious conditions, it is important to consult your veterinarian to help you decide the best course of treatment for your pet.
What Could my Pet be Allergic to?
Some of the most common allergens that affect pets seasonally are:
- Plant and tree pollens
- Mold spores
- Yeast and other bacteria
- Dust and storage mites
- Fleas
Treating Seasonal Allergies in Pets:
Seasonal allergies are a chronic condition that has no cure. However, many treatment options are available to manage symptoms and keep your furry friend feeling their best. We recommend consulting a veterinarian to help you determine what course of treatment is best for your pet.
Baths – Bathing your pet with a soothing shampoo will not only remove any allergens from your pet’s skin but also relieve symptoms like itching. Choose a shampoo with gentle ingredients such as coconut to hydrate the skin while minimizing inflammation or one that is formulated specifically for allergies and itch relief. Our experts recommend the OxyMed medicated or hypoallergenic oatmeal shampoos and soothing sprays for bathing pets with seasonal allergies.
Wipe Off Their Coat & Paws – When pets return from being outside, they can carry allergens inside with them. A quick way to combat this without giving them a bath is to use a moist cloth or hypoallergenic pet wipe to wipe down their coat, skin and paws each time they come inside. Tropiclean gentle coconut hypoallergenic wipes work perfectly for this!
Flea & Tick Prevention – Protect your pet from flea or tick irritation by regularly treating them with preventative treatments. Our experts recommend the Advantage II treatment for your canine or feline friends and the K9 Advantix treatment for canines only.
Inside Your Home – Cut down on airborne allergens inside your home by regularly changing air filters, running a dehumidifier to remove moisture and prevent mold and bacterial growth, vacuuming at least once per week, and remember to regularly wash areas that typically pick up allergens like rugs, curtains, blankets, and pet beds.
Dietary Supplements – Coconut oil, fish oils, and fatty acids like omegas 3 and 6 are a natural way to improve your pet’s skin and coat health. They can also help with anal gland irritation during allergy season. Supplementing your pet’s diet with these natural remedies can reduce itching and skin irritation, as well as improve overall coat health. Smart Earth camelina oil is a great source of omega 3 and 6 to help with pet’s allergies, skin and coat, joints and mobility, hearth health and more. Find this and other supplements, including Thrive herring oil, at your local Feeds’n Needs!
*Note – It can take 4-6 weeks for an omega-3 fatty acid supplement to take effect. If your pet is prone to seasonal allergies and skin irritation, we recommend supplementing year-round.
Topical Treatments – There are many topical treatment options that may help treat skin infections or irritation caused by seasonal allergies. These may include anti-bacterial or anti-fungal sprays, ointments, or wipes.
Ear Cleaning – Keeping your pet’s ears clean, especially after a bath or water activities, can help prevent bacterial growth and infections in the ears. Tropiclean dual action ear cleaner will both clean and dry your pets’ ears, working effectively to prevent bacteria.
Veterinary Treatments – Depending on the severity of your pet’s allergic reactions, your veterinarian may prescribe a more aggressive form of treatment such as steroids, antihistamines, or immunotherapy.
Our experts understand that each pet has its own unique needs, and this applies to seasonal allergies too. Stop by your local Feeds’n Needs to check out our selection of supplements, shampoos, and remedies to help your pet this allergy season!
For more tips and information about your pet’s health and wellbeing, check out some of our other blogs!
Dog Grooming Tips for Spring
What You Need to Know About Your Dog’s Paws
How to Properly Clean Your Dog’s Ears
Sources:
https://www.animalhumanesociety.org/resource/signs-your-pet-has-seasonal-allergies-and-what-you-can-do-help
https://www.dogtopia.com/blog/dog-seasonal-allergies/
https://www.petmd.com/dog/conditions/skin/seasonal-allergies-dogs
https://www.hillspet.com/dog-care/healthcare/managing-dog-seasonal-allergies?lightboxfired=true#\

Deworming Your Horse
Deworming your horse four times a year is ideal. It is recommended to do it once per season, alternating between various types of dewormer to help keep the parasites from becoming immune to the ingredients. If symptoms persist, contact your veterinarian.

Our Equine Worming Products:
Panomec (1.87% Ivermectin):
Treats large and small strongyles, threadworms, pinworms, ascarids, hairworms, large mouth stomach worms, and bots.
Safe for horses of all ages, pregnant mares, and foals over eight weeks.
Strongid P (6.6% Pyrantel Pamoate):
Treats large and small strongyles, pinworms, ascarids, and tapeworms.
Safe for horses, pregnant mares, and foals over eight weeks.
IVL Ivermectin Liqiud (Ivermectin):
Treats internal nematodes and bots.
Safe horses of any age, pregnant mares, foals over eight weeks
Quest (2% Moxidectin):
Treats large and small strongyles, roundworms, stomach worms, pinworms, hairworms, integumentary microfilariae, tapeworms, and bots.
*MUST HAVE SPECIFIC WEIGHT OF HORSE AS YOU CAN EASILY OVERDOSE ON QUEST PRODUCTS*
Safe for horses, ponies 16 weeks +, and pregnant mares.
Quest Plus (2% Moxidectin & 12.5% Praziquantel):
Treats large and small strongyles, roundworms, stomach worms, pinworms, hairworms, integumentary microfilariae, tapeworms, largemouth stomach worms, and bots.
*MUST HAVE SPECIFIC WEIGHT OF HORSE AS YOU CAN EASILY OVERDOSE ON QUEST PRODUCTS*
Safe for horses, ponies 16 weeks +, and pregnant mares.
Safeguard (10% Fenbendazole):
Treats large and small strongyles, roundworms, and pinworms.
Safe for horses, ponies, foals, and pregnant mares.
Eqvalan Gold (1.55% Ivermectin & 7.75% Praziquantel)
Treats tapeworms, large and small strongyles, threadworms, pinworms, roundworms, hairworms, large mouth stomach worms, and bots.
Eqvalan Gold is the most popular broad-spectrum wormer we sell.
*NOT SUITABLE FOR PREGNANT MARES*
Safe for foals over eight weeks, horses and ponies.
PowerMectin (1.87% Ivermectin):
Treats large and small Strongyles, intestinal threadworms, pinworms, ascarids, hairworms, largemouth stomach worms, neck threadworms, and bots.
Safe for horses, pregnant mares, and foals over eight weeks.
Worms by Season:
Spring: Roundworm/Tapeworm
Summer: Roundworm/Small Redworm
Fall: Encysted Redworm/Tapeworm/Bots
Winter: Tapeworm/Pinworm
At Feeds’n Needs, we think your horse deserves the best care! Stop by your local Feeds’n Needs, and one of our Experts can show you our selection of worse dewormers and help you find the right one.

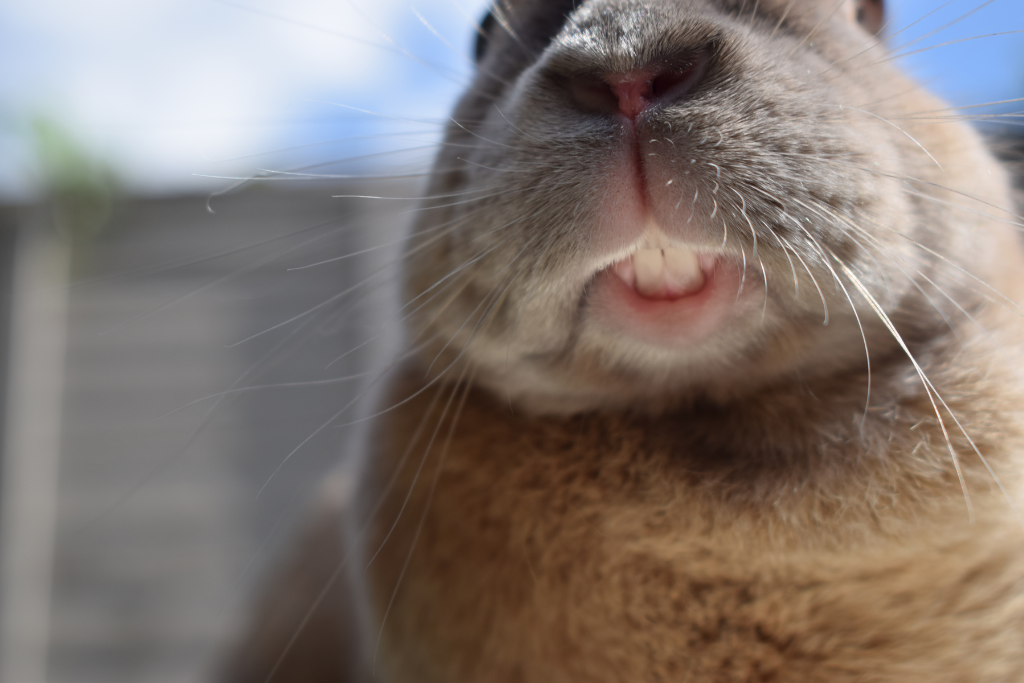
Why Guinea Pigs Need Vitamin C
Guinea pigs are wonderful pets that are a joy to observe and interact with, and they have something in common with us humans that no other companion pet does! Did you know that guinea pigs can’t make their own vitamin C in their bodies like most other animals do? Just like humans, they have to get it through their food. As a responsible piggie parent, it’s your job to ensure that your guinea pig’s diet meets their unique nutritional requirements, and we’re here to teach you all about it!
Why is Vitamin C so Important?
The body needs vitamin C to make collagen, a building block for all kinds of different issues. This means that vitamin C plays an important role in keeping skin, joints, gums, and the whole immune system healthy and helping wounds heal.
What Happens if Guinea Pigs Don’t Get Enough Vitamin C?
Most guinea pigs need between 10 and 30mg of vitamin C per day to maintain good health. Any excess that is not required will be excreted through the urine and will not be absorbed through the body. Piggies who are still growing, pregnant, nursing, or sick may require extra vitamin C in their diet as recommended by your veterinarian.
Deficiency in vitamin C is generally referred to as ‘scurvy’ and in guinea pigs, will typically present itself as the following symptoms:
- Poor coat
- Swelling and ulcers on the skin or gums/mouth area
- Diarrhea
- Poor appetite
- Swollen joints and difficulty moving
- Lethargy
- Issues with wound healing
How do you Supplement Vitamin C in the Diet?
While a guinea pig’s diet should include around 80% hay, a portion of formulated guinea pig food, as well as fresh vegetables and fruit, must be fed daily to supplement them with the required vitamin C.
- Packaged Food: Guinea pig food you buy at the store should be of good quality and contain high amounts of vitamin C in a stabilized form. Vitamin C is considered a relatively “unstable” vitamin, meaning it will break down over time, especially if exposed to light, heat, and moisture. Because of this, your guinea pig may not receive the amount of vitamin C listed on the bag. It is always recommended to follow the manufacturer’s “best before” recommendation and try to feed the entire bag of food within 90 days after opening to ensure that your guinea pig does not become deficient. It is also important to monitor whether or not your piggie is eating all the food given to them. Many mixed guinea pig foods contain “extras” such as dried fruit, seeds and nuts alongside the fortified pellets containing added vitamin C. However, these pellets are typically the least appealing to guinea pigs, and they will often pick out the “extras,” leaving the nutritionally balanced pellets behind. Our experts recommend feeding your guinea pigs a purely pelleted formulation to ensure that they consume the required vitamins and nutrients. Check out our selection of quality guinea pig food options in store!
- Vegetables & Fruit: Besides pellets, the other primary source of vitamin C for guinea pigs is fresh vegetables and occasionally fruit. Feed a portion of veggies that are high in vitamin C each day, such as leafy greens, but be cautious not to overfeed veggies or fruits that are high in sugar (leads to obesity or intestinal issues) or high in calcium (guinea pigs are predisposed to bladder stones). Check this detailed chart to help you decide which fruits and veggies are safe for your guinea pigs: https://guineadad.com/blogs/news/guineadad-veggie-masterlist-what-kinds-of-vegetables-can-your-guinea-pig-eat
At Feeds ‘n Needs, we think your animals deserve the best, and that’s why we are proud to offer top-quality nutrition solutions for pets of all sizes! Stop by your local Feeds ‘n Needs, and one of our experts can show you our selection of guinea pig foods your piggie will be sure to love! We are always happy to answer any questions you may have!
Are you interested in learning more about small animals? Check out our related blog posts!
Small Animal Dental Health

Calving Supplies Checklist
When it comes to the birth of new calves, things sometimes go differently than planned. From difficult labor and delivery to dealing with sick, cold newborns, when you’re expecting a pregnant cow to give birth, you need to be prepared for any scenario. Make sure your calving kit is fully stocked and ready to go prior to the due date of the first calf so that even if it’s born early, you’ll be prepared. Our calving supply checklist is a great guide to help you make sure you have everything you need this calving season!
Veterinarian Contact Information
If you plan to own and breed cattle, you’ll want to make sure you know who your local farm veterinarian is and keep their contact information on file in case of an emergency. It’s not uncommon for a cow to require assistance to deliver her calf; however, sometimes, if the farmer cannot get the calf out, a veterinarian must be called to the farm to perform emergency measures.
Notebook & Pencil
Keep a detailed record of important information, including breeding and due dates, so you have a rough idea of when to expect calves. Record newborn calves’ birth date, sex, birth weight, and any additional information such as the ID numbers of each cow and calf pair, whether or not a bull calf has been castrated, and any health issues noticed.
Calving Pen
Calving areas should be sheltered from cold weather, have clean straw or shavings for bedding, and ideally have a functional chute in case of emergencies requiring medical intervention. Make sure your calving pen has adequate lighting and keep a flashlight close by in case you need to inspect a cow or calf. Stock up on dust-free chopped straw or wood shavings at your local Feeds ‘n Needs.
Heating & Drying Sources
Since they are born covered in amniotic fluid, calves must be quickly dried and warmed up after birth to prevent them from developing hypothermia. A cow should be allowed to lick her calf clean after delivery; however, in cases of cold weather or if the mother does not clean her baby, have towels and blankets ready to dry the calf off and stimulate blood circulation. If a newborn gets chilled, have a warming box or other heat source like hair dryers and heat lamps ready to use to get the calf warm. Use a thermometer to keep track of calves’ temperatures, especially if they are sick or hypothermic. Always sterilize thermometers after use.
Gloves & OB Lubricant
Keep boxes of long and short disposable gloves to protect you and your animals from bacteria entering the body, and always change gloves between working with different animals. If a cow requires assistance delivering her calf, have lots of regular obstetrical lubricant on hand to lubricate the birth canal and your gloved arms to reduce friction and swelling. If your cow may require a C-section, avoid using J-lube to try and get the calf out, as it is toxic to the peritoneal cavity and will be fatal to the cow.
Halter, Rope & OB Chains
Ensure you have clean OB chains and handles ready in case you have to intervene and assist a cow during delivery. Additionally, have a halter and long rope prepared for laying down a cow to make delivery easier.
Disinfectant
A 7% iodine solution or chlorhexidine should be used to dip the calf’s navel after birth to keep it clean and disinfected. Additionally, you can add these disinfectants to a bucket or squeeze bottle of water to create wash water for cleaning the cow after delivery. Roll cotton soaked in this disinfectant water also works well to wash the cow.
Colostrum & Milk Replacer
The colostrum, or “first milk” a pregnant cow produces, is rich with antibodies and nutrients, which are vital for her calf to receive in the first 4 to 6 hours after birth. Calves should be standing and nursing on their own within 1 hour. Otherwise, you may need to intervene. If you are worried that a calf is not getting colostrum, or if you have a calf too weak to nurse on their own, frozen colostrum or dried colostrum mixed with warm water should be readily available to administer to the calf. Colostrum replacer products should contain a minimum of 100g of lgG per dose. Keep powdered milk replacer on hand for calves that will be bottle fed. Trust Feeds ‘n Needs to provide you with the best quality powdered colostrum and milk replacers to help your calves grow and thrive.
Feeding Supplies
A flexible stomach feeding tube and large syringe may need to be used to administer colostrum to weak or sick calves that are unable to suckle. Be sure to sterilize supplies between calves or keep a second stomach tube on hand to feed sick calves only. Additionally, keep bottle feeding supplies like calf bottles and extra nipples on hand to bottle feed calves that are stronger and able to suckle.
Needles & Syringes
Keep an assortment of sterile needles and syringes in your calving kit for administering supplements, vaccines, antibiotics, or other medications as per your veterinarian’s recommendation.
Use a bulb syringe to suction amniotic fluid out of newborn’s noses so they can breathe.
Injectables & Supplements
Administering supplements of the vitamins A, D, E, and selenium, as well as a mix of electrolytes for calves, is recommended for newborns. Our experts recommend the AVL Vitaferst-Care oral neonatal supplement for ruminants to give your calves the best start at life. Medications and vaccinations can be administered as per your veterinarian’s recommendation. Additionally, it’s always beneficial to keep scour pills or a prevention solution on hand in the event a calf develops scours and requires immediate treatment. If you do not have access to scour pills from your vet, we recommend administering Calf Renova at the first signs of diarrhea or Calf Perk to get a cold, weak calf to its feet after birth. Ask your local Feeds’ n Needs experts about product availability.
ID Equipment
Each head of cattle in Canada is required to have a registered CCIA tag before being transported from their farm of origin. These can be bought from an authorized dealer like your local Feeds ‘n Needs store. In addition to CCIA tags, you may want to tag your cattle with an on-farm ID tag, which should be done within the first few days of a calf’s life as cows sometimes swap calves, making future genetic selections inaccurate if calves were not tagged at birth. If you plan to give your calves tattooed ID numbers, ensure all your equipment is clean and in good working order.
Elastrator Rings & Tool
If you plan on castrating bull calves, you will need to make sure you have elastrator rings and the proper elastrator tool. Castration of bull calves is typically done between 1 week and 5 months of age. Be sure to record which calves are being castrated and which are not.
When it comes to calving, expect the unexpected and always be prepared. Stop by your local Feeds ‘n Needs to pick up some essential calving kit items so that you’ll be ready when the first calf arrives!
Disclaimer: Feeds ‘n Needs is not qualified to give medical advice or recommendations; please consult your veterinarian for any concerns, vaccine recommendations, etc.

Lambing Supplies Checklist
The arrival of new lambs can be exciting and busy, so the best way to guarantee a smooth lambing season is to ensure you are well-prepared in advance. In this blog, we will review the essential supplies that every shepherd should have on hand before the arrival of any lambs.
Notebook & Pencil
Have a notebook to record all contact between ewes and rams, and use a gestation table to calculate approximate due dates. Knowing roughly when to expect lambs to be born allows you to ensure you have all supplies on hand at least a week before due dates.
Use this notebook to keep track of other things, such as ewe and lamb ID numbers or colors, any health issues you have noticed, etc.
Lambing Pen
Ewes and their newborns should have an isolated pen away from the rest of the flock for the first several days after birth to allow a safe place for them to bond. The pen should be at least 5’ x 5’, and bedding should be kept clean and dry to prevent infection, especially after lambs are born.
Lighting
Keep bright flashlights or headlamps nearby if your barn does not have great lighting. If a lamb arrives at night, you’ll need a good light source to assist the ewe and her newborn.
Heat Sources
Newborn lambs are susceptible to hypothermia, so several methods to warm a chilled lamb can be vital to survival. Hair dryers, warming boxes, and heat lamps are all great ways to get a lamb warm after birth when used with caution. You can also place a lamb’s body in a plastic bag with its head sticking out and sit it in a warm water bath to quickly raise its body temperature without affecting its smell.
Digital Thermometer
Monitor lamb’s temperature to ensure it isn’t too cold or sick. A normal temperature for a lamb is 38.8°C to 39.4°C, if the temperature drops below 37.7°C, the lamb is hypothermic.
Towels and Paper Towel
Lambs are born covered in amniotic fluid which the mother ewe should clean off. While this is important for their bonding, you may need to assist the ewe and help get the baby dry using towels or paper towels to prevent the lamb from getting cold.
Bulb Syringe
The use of a bulb syringe may be required to suck any amniotic fluid out of a newborn lamb’s nostrils after birth to allow it to breathe.
Iodine Spray or Dip
Whether or not you decide to cut a newborn lamb’s umbilical cord using sterile scissors, the navel can serve as a pathogen pathway to a lamb, and it is vital that the area be kept clean. Use a 10% iodine spray or dip solution to keep the area disinfected, and make sure that the lambing pen has clean bedding.
Lubricant
Keep some OB lubricant on hand in case it’s needed. This can be helpful to lube up a thermometer, getting a lamb’s head unstuck during birth, or lubricating your arm and any needed birthing tools if the ewe requires help while giving birth.
Gloves
Keep boxes of long and short gloves to use when handling lambs and ewes to prevent bacteria from entering your body. Be sure to use different gloves when handling different sheep to avoid the potential spread of infection.
Colostrum & Milk Replacer
Lambs need to nurse during the first 24 hours of their life to receive the nutrients and antibodies from the ewe’s first milk, called colostrum. Before a lamb can nurse, you must strip the wax plug from the ewe’s teats and ensure her milk flows. If a lamb is rejected by its mother, or if you have a lamb that is too weak to nurse, have powdered or frozen colostrum that you can warm and feed to them as they must receive this vital colostrum within their first 8 hours of life. It is also a good idea to keep a lamb milk replacer on hand in case of a rejected lamb that may need to be bottle-reared.
Feeding Supplies
A flexible stomach feeding tube and large syringe can feed weak or cold lambs that can’t suckle on their own. Additionally, keep bottle-feeding supplies on hand, including lamb bottles and nipples, to feed stronger and able-to-suckle lambs, such as a triplet or rejected lamb.
Needles & Syringes
Have a variety of sterile needles and syringes to be used to administer any injectables or vaccines as recommended by your veterinarian.
Injectables & Supplements
Injectable vitamins A, D, and E with Selenium may be given after birth, as well as injectable antibiotics or vaccines per your veterinarian’s recommendation. Additionally, it can be beneficial to keep a propylene glycol solution on hand to help an exhausted ewe regain her energy after birth. This is especially helpful for ewes who have given birth to twins or triplets.
Elastrator Rings and Tool
If you plan on castrating ram lambs not intended for breeding, you will want to make sure you have elastrator rings and the appropriate elastrator tool to castrate within the first week of the ram’s life. The same rings and tool can be used to dock a lamb’s tail. Unless you plan on leaving your lambs with their natural long tails, they will need to be docked within the first few days of their lives.
ID Tags & Applicator
Animals intended to be sold and shipped must have registered CCIA tags which can be purchased from an authorized dealer. You may also want to tag your lambs using a different tag to use as an on-farm ID. Use your notebook to keep track of animal ID’s!
Marker Crayons or Spray
Identify your animals more easily by marking your ewes and lambs with colored ID-marking crayons or sprays. Use this method to keep track of twin lambs, mother and lamb pairs, banded ram lambs, etc. Keep notes of your ewes and their lambs in your notebook.
Get prepared for lambing season with a trip to your local Feeds ‘n Needs! Our stores carry a variety of essential supplies to ensure that you can be well-prepared for the arrival of new lambs! Our Experts will be happy to help you find what you need!
Disclaimer: Feeds ‘n Needs is not qualified to give medical advice or recommendations; please consult your veterinarian for any concerns, vaccine recommendations, etc.
Spring Cleaning Your Coop
Springtime is just around the corner, which means it’s time for some spring cleaning. With the days getting longer and temperatures getting warmer, it’s the perfect time to deep clean your chicken coop and prepare your chickens for the season ahead.
Do a Health Check:
With the change of seasons, it is important to perform a quick health check on your birds. Check for overgrown beaks or toenails that need to be clipped, any abnormalities to their feet, cuts or wounds that require treatment, and ensure no mites or lice are hiding in their feathers.
Coop Cleaning: Step by Step
Wintertime typically leads to a messy chicken coop since birds aren’t out free-ranging, and cold temperatures make cleaning or repairs more challenging. This is why when spring arrives, thoroughly cleaning your coop and all supplies is essential to keeping your birds healthy and happy.
1. Remove and Clean Accessories
When you’re cleaning out your coop, you first want to remove any moveable accessories such as feeders, waterers, nesting boxes, broody cages, etc. Take any dirty bedding out of the nesting boxes and use a putty knife or scraper to remove any residue inside of them. Use a non-toxic cleaner or Dawn dish soap with a scrub brush to give those accessories a good scrub until clean. Rinse everything thoroughly and set in the sun to dry. If the winter weather was harsh on some of your feeders and waterers, be sure to stop by your local Feeds’ n Needs to find quality poultry essentials to last you for seasons to come!
2. Clear Out Dirty Bedding
Next, use a shovel to remove all the old bedding in your coop. You can use a broom to sweep the floors and the walls or ceilings to get rid of any remaining debris. Lice and mites are known to hide during the day, so it is important to pay extra attention to areas like corners and edges, under roosts and in between seams of the floor when cleaning out your coop. Mixing equal parts water and vinegar, you can make an at-home, non-toxic cleaning solution to spray down all the walls, floors and other surfaces in your coop and thoroughly scrub before putting everything back inside. This is also the perfect time to spray or dust any products to eliminate mites or lice if you have an issue with them. We carry a variety of easy-to-use products that will help you rid your coop and flock of pests in no time.
3. Inspect Your Coop
While your coop is empty and clean, thoroughly inspect it. The best defense against predators is having a safe coop to protect your birds. Check your coop for any loose boards, nails, or hardware, large or small holes that predators could fit through, leaks in the roof, and holes or weak points in your fencing. Be sure to make necessary repairs as soon as possible to prevent unwanted visitors from harming your flock.
4. Put Everything Back Together
Once your coop is clean and dry and repairs have been made if needed, refill your coop and nesting boxes with clean bedding of your choice. Our bales of pine shavings and dust-free chopped straw make excellent bedding options for your coop year-round. You can replace heated waterers with regular ones; keep an eye on the temperature forecast to ensure the water won’t freeze. Warm spring days often lead to cold nights, so be diligent. Fill feeders with fresh food and return your chickens to their clean coop!
Stop by your local Feeds ‘n Needs store to view our large selection of poultry essentials, which will help you get your spring coop cleaning under way!
For more tips, tricks, and information about raising and owning chickens, check out our related blogs:
Hen’s Health Throughout the Seasons
Prep Your Coop for Chicks
Livestock Bedding Options
Sources:
https://bestnestbox.com/blogs/news/how-to-clean-and-disinfect-your-chicken-coops-for-spring#:~:text=Mix%20equal%20parts%20vinegar%20and,for%20an%20all-natural%20cleaning.
https://www.muranochickenfarm.com/p/coop-and-housing-posts.html
https://www.muranochickenfarm.com/2018/02/preparing-chickens-for-spring.html
Small Animal Dental Health
As responsible small animal owners, it’s our job to educate ourselves on the proper care needed to ensure our pets’ health and well-being, including taking care of their dental health.
Did you know many small mammals, such as rabbits, guinea pigs and chinchillas, have open-rooted teeth? Meaning that throughout their entire lives, their teeth never stop growing! Because of this, these animals are more at risk of acquiring painful dental issues such as tooth overgrowth, abscesses in the mouth, and malocclusion (misalignment of the teeth).
Early Detection is Key
Because they are prey animals, it’s in the nature of our small pets to hide any signs of pain or illness they may be experiencing. This can make early detection difficult, so taking your small pets to be examined by a veterinarian at least once per year is recommended. A vet specializing in exotic pets will be able to thoroughly examine your pet and identify any issues that should be treated immediately to ensure your pet’s good health.
Between checkups, it is important to familiarize yourself with the normal appearance of your pet’s teeth and know what symptoms or behaviours could indicate possible dental issues.
Symptoms to Watch For:
- Noticeably overgrown teeth
- Difficulty chewing or dropping food from the mouth
- Watery eyes, nasal discharge or drooling from the mouth
- Weight loss
- Reluctance or refusal to eat
- Reduced grooming and/or bald patches of fur
- Visible signs of pain (i.e., hunching in a corner, grinding teeth, etc.)
Prevention
Thankfully, most forms of acquired dental disease in small animals are preventable with proper diet and care. For small herbivores like rabbits and guinea pigs, a diet that lacks free-choice hay is arguably the most common cause of these dental issues.
- Hay vs. Pellets – Because hay is high in fibre and stimulates natural chewing and dental wear patterns, various grass hay options should always be available to your herbivorous animals. While many pet parents still consider hay more of a treat for their small pets, at least 75% of their diet should be made up of it, with fortified pelleted food being fed daily in a measured amount (following the manufacturer’s direction.) We offer a variety of grass hay and pelleted foods to provide your small pets with the proper diet they require.
- Leafy Greens and Vegetables – Supplementary foods such as dark leafy greens and vegetables have a coarse consistency, which will help your small animals keep their teeth worn down and should be offered to them in a limited amount daily. Ensure that the vegetables or greens you give your pet are safe for their particular species.
- Chew Toys – Besides providing a proper diet, species-appropriate chew toys should also be available to your small pets. Toys and chews made from woven hay, untreated wood, dried sticks, or cardboard provide excellent opportunities for your pet to wear down their incisors while offering them enrichment and mental stimulation. We have a great selection of safe, natural chews to keep your pet busy while keeping their teeth healthy!
Visit one of our Experts at your local Feeds ‘n Needs store to see our great selection of small animal essentials and ask any questions you may have about proper dental care. We are always eager to help!

How to Brush Your Dogs Teeth
Brushing your dog’s teeth for the first time can be intimidating, and you may be wondering where to start. Having their teeth brushed is an unnatural feeling for dogs, so you must be diligent in taking all the proper steps to ensure that your dog is introduced stress-free.
Your local experts at Feeds’ n Needs will gladly help you select the proper tools to help you get started brushing your pup’s teeth!
What you’ll need
- Dog toothbrush or finger brush
- Pet safe toothpaste
- A soft cloth or piece of sterile gauze
- Your dog’s favourite treats
Introducing your dog to teeth brushing should be done gradually over several sessions, and depending on your dog, it can take a week to several months to accomplish successfully. Only do as much as your dog will tolerate during one session, and be sure to reward them through the entire process.
How to Brush Their Teeth
Step 1:
- Make sure your hands are clean before you begin, then find a quiet place where you and your dog will be comfortable without any distractions.
Step 2:
- Offer your dog a taste of the pet-safe toothpaste you will be using by putting a small amount on your finger and letting them lick it off.
Step 3:
- Using your finger, gently rub a bit of toothpaste onto the outer side of the dog’s upper teeth in a back-and-forth motion. Your dog may only tolerate a few seconds of this, so it’s best to focus on only a few teeth at first.
Step 4:
- Once your dog is comfortable with step 3, use a soft cloth or sterile gauze over your finger to brush the toothpaste onto your dog’s teeth. Go slow and focus on brushing only the outsides of the teeth. Most of the plaque and tartar buildup occurs on the outer sides of the teeth, so brushing the inner sides should only be done once your dog is very comfortable with brushing their teeth.
Step 5:
- Next, it’s time to introduce the toothbrush or finger brush to your dog. Apply a pea-sized amount of toothpaste to the brush, and holding it at a 45-degree angle, gently lift one side of your dog’s lips and begin brushing. Use circular motions and start with the teeth at the back, slowly working towards the front on each side. Once your dog feels comfortable with this, you may also begin brushing its bottom teeth during your sessions. To brush the bottom teeth, gently tilt the dog’s head back, allowing their mouth to open slightly. You can use your finger to hold the lip away from the teeth, then repeat the same brushing process that you did on the top. It is recommended to brush each side for 30 seconds if your dog allows it.
Step 6:
- Thoroughly rinse your dog’s toothbrush after every use, and wash your hands to avoid spreading any harmful bacteria. Pet toothbrushes should be replaced every three months, and NEVER use the same toothbrush on multiple pets.
Praising your dog and rewarding them with treats throughout every step will help to reinforce their positive association with having their teeth brushed. We carry a wide variety of healthy treats that your pup will find irresistible, even while having their teeth brushed!
For more information on the importance of dental health in pets and what you can do to prevent dental disease, check out some of our other helpful blogs!
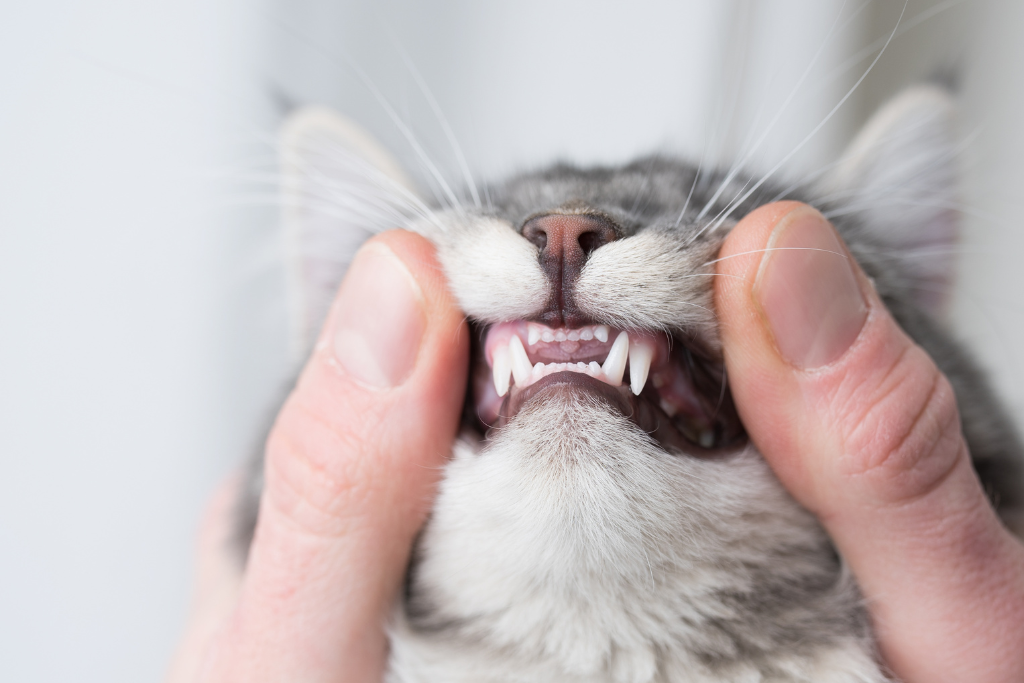
How to Brush Your Cats Teeth
When introducing your cat to having its teeth brushed, patience is key. Ensuring that the experience is pleasant for you and your cat will require time, trust, and rewards for your feline friend. Before you begin, you’ll want to make sure you have all your supplies ready.
Your local experts at Feeds’ n Needs will help you find everything you need to start brushing your cat’s teeth!
What You’ll Need
- Cat toothbrush or finger brush
- Pet safe toothpaste
- Q-tip or cotton bud
- Your cat’s favourite treats
- Towel or blanket (optional)
Cats respond well to routine, and they may benefit from having their teeth brushed at the same time every day. Choosing a time of day when your cat is typically calm or hungry can make them easier to work with, as they will likely be more eager to accept treats and gentle pats as a reward for their cooperation.
How to Brush Their Teeth
Step 1:
- Choose a quiet time and place, such as a small room where the door can be closed to prevent your cat from escaping. You can place your cat on a countertop or table covered by a towel or sit with them in your lap. With the cats back toward you, ensure you can keep a gentle but firm hold on them. If your cat is particularly nervous, you may wrap them in a towel or blanket and have someone hold them to make sure they’re secure while you brush their teeth.
Step 2:
- Introduce your cat to the feeling of having their mouth touched by gently moving their lips and running your finger along their teeth and gumline. If your cat tolerates this well, reward them with treats and some gentle scratches if they enjoy it.
Step 3:
- Once your cat is familiar with your fingers touching their mouth, introduce the pet-safe toothpaste by placing a small amount on your finger and letting them lick it off. If the cat refuses to lick it from your finger, you can try putting a bit on the tip of their nose; they should instinctively lick it off.
Step 4:
- Using a Q-tip with a small amount of toothpaste on one end, gently rub the applicator tip along the outer surface of the cat’s teeth. Starting with the back teeth and working forward, rub the toothpaste into the teeth using circular motions. Your cat will likely only tolerate a few seconds of this at first, so focus on only a few teeth during your sessions until your cat grows more comfortable. Reward your cat’s cooperation with lots of treats.
Step 5:
- Introduce the toothbrush to your cat by allowing them to lick a bit of toothpaste from the bristles. To ensure you have a secure grip on your cat while brushing their teeth, spread your hand wide and place your palm over the top of your cat’s head towards the back of their skull. Your thumb and second finger will grip around the cheekbones just under the eyes, allowing the cat’s mouth to fall open gently. Ensure your index finger is lifted to avoid covering the cat’s eyes. Now that you are holding your cat securely, use the same circular motions working from the back towards the front, and begin to gently brush the outer side of the cat’s teeth. As your cat gets more comfortable with each session, you can increase the time spent brushing each side until you can brush for 30-45 seconds per side.
Tooth brushing is unnatural for cats and can be stressful for them to adapt to, so be patient and do not rush the process. Taking as many days as necessary to get your cat comfortable at each step, reassuring them in a soothing voice and rewarding them with treats throughout is essential to helping them form a routine and making each experience a positive one.
Stop in at your local Feeds’ n Needs to pick up some well-deserved treats and toys for your cat, and be sure to ask our experts any questions you may have about your cat’s dental health!
For more information and resources about pet dental health, check out some of our other blogs:

Pet Obesity Awareness
National Pet Obesity Awareness Day takes place every year in October. It is a day to remind people to keep their pets healthy. Obesity is the #1 health risk for pets. Now is the perfect time to start focusing on your pet’s weight. When your cat or dog starts to look a little plump, you know it is time for a few things – more walks, fewer table scraps, and perhaps even an additional visit to your vet. Here is why it is important to maintain your pet’s weight and why it should be your number one priority!
Pet obesity is well-known for causing the following:
– Chronic inflammation
– Reduced life expectancy
– Weakened immune system
– Cardiac diseases
– Joint problems
– Diabetes
– Respiratory disorders
– Cancer
– Metabolic disorders
– Kidney dysfunction
– Poor quality of life
You can use several strategies if your cat or dog has put on some weight.
- Portion Control: Measure your pet’s food.
- Calorie Deficit Diet: Prefer feeding a low-carb, low-fat diet.
- Fibres: Add more fibres to their diet to help keep them fuller for longer.
- No Unhealthy Treats: Give only healthy and natural treats such as Crumps Sweet Potato chews – available at your local Feeds’n Needs.
- Regular Exercise: More walks and exercise help burn extra fat.
- Dry Food/Wet Food: Wet pet food has a higher water content, which promotes feeling full.
If you’ve tried all these strategies and your pet is still not showing any signs of losing weight, visit or call your veterinarian for the best suggestions.


