
As the ground thaws and the days get longer, spring becomes the season gardeners wait for all year. Whether you’re a seasoned grower or just starting out, a bit of planning can make all the difference in how your garden thrives. Spring gardening isn’t just about planting—it’s about preparing your soil, choosing the right seeds, understanding your climate, and setting your space up for success.
A good place to start is with your soil. After a long winter, soil often needs a refresh. Loosening it up, checking drainage, and adding organic matter like compost gives your plants the nutrients they need right from the start. Spring is also when many gardeners reach for a balanced fertilizer—10‑10‑10 is a classic choice—to give lawns, beds, and vegetables a helpful boost.
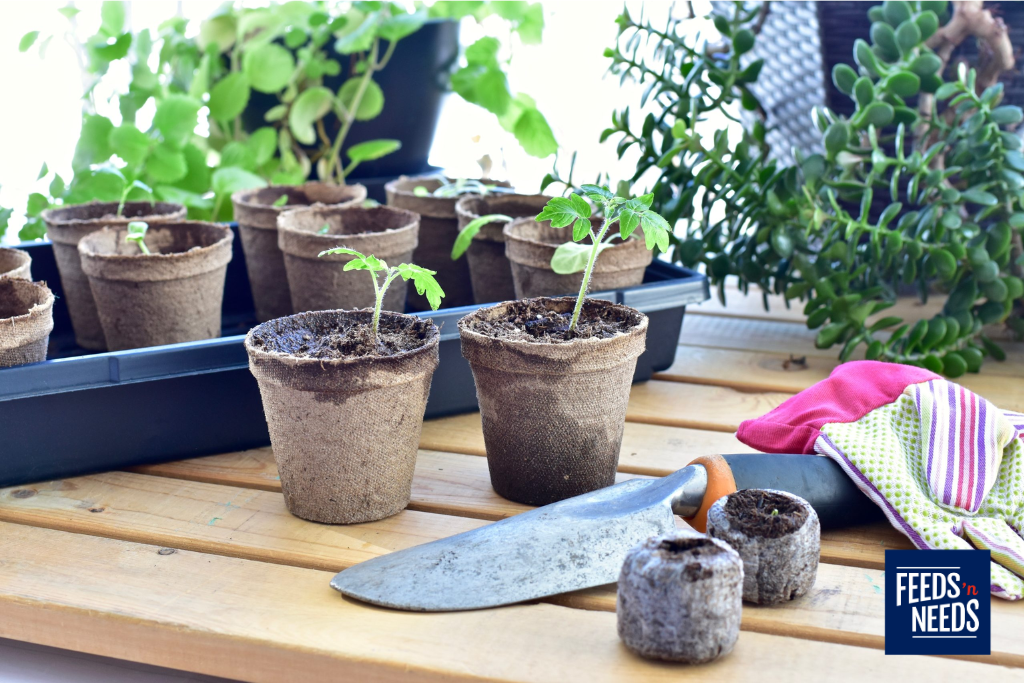
Next comes the fun part: choosing what to grow. Spring is prime time for hardy vegetables, cold‑tolerant flowers, and seed starting. If you want a head start, using a seed starting mix can make a world of difference by creating the ideal environment for germination. Just be sure to match your choices with your region’s frost dates—some plants love early cool weather, while others will need to wait.
Spring is also the perfect time to think about pollinators and biodiversity. Incorporating native plants, adding a pollinator water source, or planting early blooms can help bees, birds, and butterflies shake off the winter along with you. If you’re a wild bird enthusiast, consider refreshing feeders, cleaning birdbaths, and adding bird‑safe window decals to keep visiting species protected.
Another key consideration is garden cleanup—but with intention. While it’s tempting to tidy everything immediately, waiting until temperatures consistently reach 10°C (50°F) gives overwintering pollinators a safe chance to emerge. When you do clean, removing debris, trimming perennials, and preparing beds helps reduce pests and opens space for new growth.
Finally, spring is a chance to rethink your garden layout. Maybe you’re adding raised beds, expanding your veggie patch, or switching to pollinator‑friendly landscaping. Dream big—spring is all about fresh starts.
With the right preparations and a little seasonal knowledge, your garden will reward you all spring and summer long. So grab your gloves, dust off your tools, and dig into the season—it’s time to grow!
Kick‑start your spring garden with confidence—stop by Feeds’n Needs for everything you need to grow healthy, thriving plants from day one.
More great resources on getting your garden started:
How to Start Seeds, by Halifax Seed Co.: https://www.halifaxseed.ca/tips/seed-starting-101
Canada Hardiness Zones, by Veseys: https://www.veseys.com/ca/canada-hardiness-zones-frost-dates
Garden Planning, by Feeds’n Needs: https://feedsnneeds.ca/advices/garden-layout-garden-starting/

Garden Layout: What to Consider When Starting Your Garden
Planning your garden layout is one of the most exciting steps in kicking off a new growing season. Whether you’re a first‑time gardener or expanding an existing space, a thoughtful layout helps you grow healthier plants, save time, and enjoy a more productive garden all season long. Here’s what to consider as you map out your perfect garden.
- Sunlight: The Most Important Factor
Most vegetables and flowers need 6–8 hours of sunlight each day. Spend a day observing your yard to see where the sun falls in the morning, afternoon, and evening.
- Place sun‑loving plants (tomatoes, peppers, squash, herbs) in the brightest spots.
- Save shadier areas for greens and cool‑season crops like lettuce, spinach, kale, and peas.
- Soil Quality & Preparation
Healthy soil is the foundation of a thriving garden.
- Test your soil or simply observe texture: is it sandy, clay-heavy, or rich and dark?
- Add compost or organic matter to improve drainage and boost nutrients.
- Consider raised beds if your soil is difficult to work with—they warm faster in spring and offer great control.
- Water Access
Make watering simple.
- Choose a location close to a hose or rain barrel.
- Avoid layouts that require dragging hoses around obstacles.
- Plan for even watering—group plants with similar moisture needs together.
- Pathways & Access
Think ahead to weeding, harvesting, and daily care.
- Leave comfortable walking paths between rows or beds.
- Avoid planting too tightly—good airflow prevents disease.
- Make sure tools and wheelbarrows can easily reach your garden space.
- Plant Spacing & Growth Habits
Different plants have very different sizes and shapes once mature.
- Place tall crops like corn, sunflowers, or trellised peas on the north side so they don’t cast shade over smaller plants.
- Give sprawling plants (squash, pumpkins, cucumbers) plenty of room—or grow them vertically on trellises to save space.
- Follow spacing recommendations on seed packets for best results.
- Garden Layout Style
Choose a layout that fits your space, goals, and lifestyle:
Rows
Traditional, easy to maintain, and great for larger gardens.
Raised Beds
Excellent organization, improved drainage, and reduced bending.
Square‑Foot Gardening
Maximizes yield in small spaces with neat, efficient planting grids.
Container Gardens
Perfect for decks, patios, and renters—grow herbs, greens, tomatoes, and more.
- Companion Planting
Pairing compatible plants can boost growth and deter pests.
- Basil with tomatoes
- Marigolds near almost anything to help reduce pests
- Carrots with onions to discourage carrot flies
- Wildlife & Pest Considerations
Consider fencing or natural deterrents if you share your space with deer, rabbits, or raccoons.
- Raised beds, row covers, or simple fencing can protect young seedlings.
- Native plants nearby attract beneficial insects like bees and ladybugs.
- Plan for the Future
A good garden layout grows with you.
- Leave room for new crops you may want to try next year.
- Consider where perennials (strawberries, rhubarb, herbs) will live long-term.
- Think about adding compost bins, rain barrels, or a tool area.
Ready to Start Planting?
A thoughtful layout sets the stage for a more productive, enjoyable gardening season. By taking time to consider sunlight, soil, spacing, and long‑term goals, you’ll create a garden that’s easy to maintain and rewarding to grow.
Seed Starting in Spring: What to Start & When
Seed Starting Guide for Atlantic Canada: What to Plant and When
Spring is the perfect time to get a jump on your garden by starting seeds indoors—especially in Atlantic Canada, where our last frost typically lands in early to mid‑May.
What to Start Indoors (and When)
Here’s a simple timeline based on regional planting calendars:
Early March
Start longer-season veggies like onions and leeks, which benefit from early indoor sowing. Both can be started in early March and transplanted outdoors in May.
Mid-March
This is when many popular garden plants can be started indoors, including:
- Basil (germinates in 5–21 days; transplant early June)
- Cabbage
- Celery (for experienced growers—germinates slowly)
These plants appreciate a few extra weeks of indoor warmth before heading outside.
Late March to Early April
As days brighten, start quicker growers like broccoli, bok choy, zinnias, marigolds, and other annual flowers to enjoy a colourful early-summer display. Many flowers—like zinnias and marigolds—are commonly started this time of year in cold climates.
Direct Sowing Outdoors
Once frost danger has passed—around mid-May in much of Atlantic Canada—you can directly sow hardy crops like:
- Carrots
- Beets
- Arugula
These can be seeded outdoors shortly after soil becomes workable.
Final Tips
- Always check your seed packets—they’re your best source for timing guidance.
- It’s better to plant a little later than too early, especially in cooler regions.
- If in doubt, base your schedule around your local last frost date to keep seedlings healthy and on track.
Stop into Feeds’n Needs to ask our experts for all your gardening needs.
More information about local frost dates: Canada Hardiness Zones Frost Dates | Veseys
Growing from Seeds | Veseys

Winter Wellness for Dogs: The Right Foods for the Season
Winter has arrived, and while we’re cozy under blankets and sipping warm drinks, our dogs feel the chill too. Winter isn’t just about keeping them warm, it’s about giving them the right nutrition to stay healthy and energetic all season long.
If you’re a pet parent wondering how to support your dog during colder months, here’s what you need to know.
Why Winter Nutrition Matters
Cold weather means your dog uses more energy to stay warm. Without proper nutrition, they can experience fatigue, a dull coat, or lowered immunity. A balanced diet tailored for winter helps keep them strong, active, and happy.
Essential Food Categories for Winter Wellness
- Protein-Packed Meals
Protein is the foundation of your dog’s health. It supports muscle strength and energy—especially important when temperatures drop. Look for high-quality kibble or wet food featuring real meat like chicken, fish, or lamb.
Tip: Check labels for “high-protein” formulas to meet seasonal energy needs.
- Healthy Fats for Warmth
Fats provide concentrated energy and help maintain a shiny coat. Omega-3 and Omega-6 fatty acids are key for skin health and warmth. Fish oil or flaxseed are great additions, and many premium foods include these naturally.
Pro Tip: Balance is important, too much fat can lead to weight gain.
- Fibre for Digestive Health
Seasonal changes can affect digestion. Fibre from carrots, pumpkin, or sweet potatoes keeps your dog’s gut healthy and helps them feel full. Many complete diets include fibre-rich ingredients for convenience. - Vitamins & Minerals for Immunity
Winter can challenge your dog’s immune system. Nutrients like Vitamin C, Vitamin D, and zinc help fight seasonal stress. Choose foods fortified with essential vitamins and minerals to keep their defences strong. - Hydration-Friendly Options
Dogs often drink less water in winter. Wet food or pet-safe broths can help maintain hydration. Serving warm broth over kibble is a comforting way to boost fluid intake.
Extra Tips for Winter Care
- Adjust Portions: If your dog is less active, reduce food slightly to avoid weight gain.
- Serve Warm Meals: A little warmth makes mealtime more inviting.
- Keep Them Cozy: Blankets, coats, and indoor play keep your dog comfortable and happy.
The Bottom Line
Winter doesn’t have to slow your dog down. By focusing on protein, healthy fats, fibre, vitamins, and hydration, you’ll help them thrive through the season. Explore Feeds’n Needs’ selection of premium pet foods and winter care essentials—because a healthy dog is a happy dog.

Types of seeds: Heirloom, Hybrid, Open Pollenated
When planning your garden, the type of seeds you choose influences everything – from flavour and appearance to how well your plants grow and whether you can save seeds for next year. Here’s a simple guide to help you understand the main seed types and how they connect to seed saving.
Heirloom Seeds
Heirloom seeds come from plant varieties that have been passed down through generations, often 50 years or more. Their genetics remain stable because they come from open‑pollinated plants that naturally reproduce true to type.
Why gardeners love them:
- Amazing flavours and unique colours
- Rich history and biodiversity
- You can save seeds, and they’ll grow true year after year
Best for:
Gardeners who love tradition, character, and seed-saving.
Hybrid Seeds
Hybrid seeds are created by intentionally crossing two parent plants to produce offspring with specific traits like disease resistance or higher yields.
Benefits:
- Strong, uniform plants
- Improved productivity
- Better resistance to pests and disease
Important to know:
Hybrid seeds won’t grow true if you save their seeds. The next generation will be unpredictable, often reverting to characteristics of the parent plants.
Best for:
Gardeners who want reliability and consistent results.
Open‑Pollinated Seeds
Open‑pollinated seeds come from plants pollinated naturally by wind, insects, or animals. Their genetics are stable, meaning they will produce plants similar to the parent.
Why they’re great:
- Seeds can be saved and replanted
- Wide variety of shapes, sizes, and flavours
- Great for gardeners who want dependable results
All heirloom seeds are open-pollinated, but not all open-pollinated seeds are heirloom.
Saving Seeds: What You Need to Know
Seed saving is a rewarding way to maintain your favourite varieties and reduce gardening costs. But success depends on starting with the right types of seeds.
Best seeds for saving:
- Heirloom
- Open‑pollinated
These seeds will reproduce true to type, giving you plants that match the parent.
Seeds not recommended for saving:
- Hybrid: Hybrids won’t produce consistent offspring, so saved seeds usually lead to surprises not always good ones!
Tips for saving seeds:
- Choose healthy, vigorous plants as parents.
- Allow fruits or flowers to fully mature before collecting seeds.
- Dry seeds thoroughly before storing.
- Store seeds in a cool, dark, dry place.
Understanding seed types helps you make confident choices in your garden. Whether you love the charm of heirlooms, the strength of hybrids, or the dependability of open‑pollinated seeds, there’s a place for each in a thriving garden. And if you enjoy the idea of growing your own “garden legacy,” seed saving is the perfect next step.
References:
3 Main Types of Vegetable Seeds Explained – Food Gardening Network
Veseys Facebook Page

Cleaning Your Horse Track for Riding Season
As winter fades and riding season approaches, giving your horse track a thorough clean‑up is one of the best ways to set the stage for safer, smoother training sessions. A well‑maintained track supports better footing, prevents injuries, and keeps your horse performing at their best. Here’s how to get your track ride‑ready this spring.
- Clear Away Debris
Start by walking the track and removing any fallen branches, rocks, leaves, or broken fencing that may have accumulated over the winter. Even small debris can throw off footing or create hazards for horses moving at speed.
- Check Drainage
Spring melt can leave tracks damp or uneven. Take note of puddles or soft spots—these often indicate drainage issues. Clearing ditches, leveling low areas, or adding drainage material helps ensure a safer, more consistent surface.
- Repair Fencing & Perimeter Areas
Inspect the track edges and fencing for winter damage. Replace loose boards, tighten wire, and ensure gates latch properly. A secure, well‑marked boundary helps keep horses focused and riders safe.
- Groom the Footing
Footing makes all the difference. Use a harrow or drag to break up compacted areas, redistribute material, and smooth the surface. This reduces strain on your horse’s joints and provides even traction throughout the track.
If your footing feels thin or uneven, consider adding fresh material—sand, screenings, or specialized footing—depending on what your track is built from.
- Address Dust Early
As temperatures rise, dust becomes a common challenge. Watering the track or using dust‑control products helps maintain visibility and comfort for both horse and rider.
- Inspect Jumps & Training Equipment
If your track includes jumps or training markers, give them a spring tune‑up. Check for loose screws, broken poles, rotted wood, and faded markers. Safe, clearly visible equipment supports better training sessions.
- Create a Maintenance Routine
Once your track is clean and ready for spring, keep it that way with a simple weekly routine—dragging, debris checks, and moisture management go a long way toward preserving footing and preventing wear.
Ready, Set, Ride!
With a bit of spring prep, your horse track can be safe, comfortable, and ready for a great riding season ahead. A clean, well‑maintained surface doesn’t just look good—it protects your horse’s health and helps every ride feel better.

The Benefits Of A Raw Food Diet For Dogs & Cats
If your pet could write their own grocery list, there’s a good chance “more raw food, please!” would be at the top. Raw diets have been getting tons of love lately and for good reason! From better nutrition to allergy‑friendly options, there are plenty of benefits packed into every bowl. And when it comes to choosing a trustworthy raw brand, Big Country Raw is a standout star.
- Made in Canada, With Love (and Great Ingredients)
Big Country Raw is a Canadian, family‑owned company based in Ontario, proudly using Canadian‑sourced ingredients in all their recipes, except their imported kangaroo protein (which would be tricky to find in the wilds of Ontario). Their commitment to local sourcing means fresher ingredients and higher quality in every bite. Plus, with a certified pet nutritionist on staff, they ensure every recipe is expertly balanced to support your pet’s health from bowl to tail. - Safety You Can Trust
Big Country Raw is HACCP certified, an internationally recognized food safety standard that ensures strict control over biological, chemical, and physical hazards. It’s the same level of oversight used in human food production, giving pet parents peace of mind. - Allergy‑Friendly Options & So Much Variety
Got an itchy dog? A picky eater? A pet with mysterious tummy troubles? With nine different proteins and a wide range of natural supplements, Big Country Raw makes it easy to tailor meals to your pet’s needs. Dogs with allergies or health concerns often thrive on raw because it’s minimally processed and rich in clean, species‑appropriate ingredients. - Nutrients That Actually Get Absorbed
The magic of raw food is how naturally digestible it is. Without heavy processing, pets can absorb nutrients more effectively leading to shinier coats, better digestion, and a whole lot more tail wagging. - Cats Need Taurine, Raw Has Plenty
Fun fact: cats can’t produce their own taurine, an essential nutrient for heart health, vision, and overall wellbeing. Big Country Raw’s cat formulas naturally contain high taurine levels, giving your feline friend exactly what they need. - Backed by a 100% Satisfaction Guarantee
Trying raw for the first time? No stress! Big Country Raw backs all food and supplements with a 100% satisfaction guarantee, making raw feeding easier and more approachable for everyone.
Raw feeding doesn’t have to be complicated—and with high-quality brands like Big Country Raw, it’s easier than ever. Better ingredients, better nutrition, and better results… your pet just might thank you with extra cuddles.
If you have any questions about a raw food diet for your pet, the knowledgeable staff at Feeds’n Needs are happy to help!
More info on raw food diets: Raw Master Class

Nesting Boxes: Prep Your Backyard for Spring Birds!
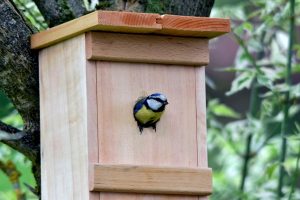
As winter fades and the first signs of spring begin to appear, birds across your neighbourhood are searching for safe, cozy places to raise their young. Adding nesting boxes to your backyard is one of the easiest and most rewarding ways to support local bird populations while enjoying a little more feathered charm right outside your window. Here’s how to get your backyard spring‑ready for nesting season!
Why Nesting Boxes Matter
Natural tree cavities are becoming harder for birds to find, especially in urban and suburban areas. Nesting boxes provide:
- Safe shelter from predators
- Protection from spring weather
- A dedicated space for raising chicks
- A way to attract more bird species to your backyard
From chickadees to bluebirds, many species rely on human‑made nest boxes as part of their spring routine.
Choose the Right Nesting Box
Not all birds use the same type of nest box. Before buying or installing one, consider:
Hole Size
Different birds need different entrance sizes:
- Chickadees: ~1 1/8″
- Bluebirds: ~1 1/2″
- Tree swallows: ~1 1/2″
Matching the size helps attract the right species and keep unwanted visitors out.
Material
Look for untreated wood (pine, cedar, spruce). Avoid plastic or thin materials, which can trap heat and moisture.
Ventilation & Drainage
Quality nesting boxes include vents at the top and drainage at the bottom to keep chicks dry and comfortable.
Where to Place Your Nesting Box
Placement matters! For best success:
- Mount boxes 5–10 feet off the ground
- Face them east or southeast to avoid harsh afternoon sun
- Keep away from heavy foot traffic and high‑activity areas
- Space boxes well apart to reduce competition between species
- Ensure there’s open flight access to avoid thick branches blocking the entrance
If you’re installing multiple boxes for species like bluebirds or tree swallows, consider placing them in pairs or clusters to reduce territorial disputes.
Clean & Prep Before Spring
Before birds begin searching for homes (usually late February into March), take a few minutes to:
- Clean out old nesting material
- Remove debris, broken pieces, or old bedding
- Check screws, roofs, and panels for winter wear
- Make sure drainage holes are clear
- Secure the box tightly so it won’t wobble in the wind
A clean, sturdy box increases your chances of hosting a successful brood.
Help Make Nesting Season a Success
Little touches can make your yard even more inviting:
- Offer natural nesting materials like twigs, dried grasses, or pet‑safe fur
- Provide fresh water in a clean birdbath
- Avoid using pesticides as birds rely on insects to feed their chicks
- Add bird feeders nearby to help parents refuel throughout the day
A supportive environment encourages birds to stay and return year after year.
Enjoy a Spring Full of Song
Setting up nesting boxes is a simple, affordable way to enjoy more bird activity this spring while supporting local wildlife. With the right placement, maintenance, and materials, your backyard could become a safe nursery for some of your favourite feathered friends.
Winter Wellness for Dogs: The Right Foods for the Season
Winter has arrived, and while we’re cozy under blankets and sipping warm drinks, our dogs feel the chill too. Winter isn’t just about keeping them warm, it’s about giving them the right nutrition to stay healthy and energetic all season long.
If you’re a pet parent wondering how to support your dog during colder months, here’s what you need to know.
Why Winter Nutrition Matters
Cold weather means your dog uses more energy to stay warm. Without proper nutrition, they can experience fatigue, a dull coat, or lowered immunity. A balanced diet tailored for winter helps keep them strong, active, and happy.
Essential Food Categories for Winter Wellness
- Protein-Packed Meals
Protein is the foundation of your dog’s health. It supports muscle strength and energy—especially important when temperatures drop. Look for high-quality kibble or wet food featuring real meat like chicken, fish, or lamb.
Tip: Check labels for “high-protein” formulas to meet seasonal energy needs.
- Healthy Fats for Warmth
Fats provide concentrated energy and help maintain a shiny coat. Omega-3 and Omega-6 fatty acids are key for skin health and warmth. Fish oil or flaxseed are great additions, and many premium foods include these naturally.
Pro Tip: Balance is important, too much fat can lead to weight gain.
- Fibre for Digestive Health
Seasonal changes can affect digestion. Fibre from carrots, pumpkin, or sweet potatoes keeps your dog’s gut healthy and helps them feel full. Many complete diets include fibre-rich ingredients for convenience. - Vitamins & Minerals for Immunity
Winter can challenge your dog’s immune system. Nutrients like Vitamin C, Vitamin D, and zinc help fight seasonal stress. Choose foods fortified with essential vitamins and minerals to keep their defences strong. - Hydration-Friendly Options
Dogs often drink less water in winter. Wet food or pet-safe broths can help maintain hydration. Serving warm broth over kibble is a comforting way to boost fluid intake.
Extra Tips for Winter Care
- Adjust Portions: If your dog is less active, reduce food slightly to avoid weight gain.
- Serve Warm Meals: A little warmth makes mealtime more inviting.
- Keep Them Cozy: Blankets, coats, and indoor play keep your dog comfortable and happy.
The Bottom Line
Winter doesn’t have to slow your dog down. By focusing on protein, healthy fats, fibre, vitamins, and hydration, you’ll help them thrive through the season. Explore Feeds’n Needs’ selection of premium pet foods and winter care essentials—because a healthy dog is a happy dog.

Prevent Cabin Fever in Pets During Long Winters
Short daylight, icy sidewalks, and stormy stretches can reduce outdoor time. Enrichment keeps pets mentally engaged, reduces anxiety, and prevents boredom behaviors (chewing, vocalizing, scratching).
Dogs: Indoor Activities
- Puzzle Feeders: Slow feeding, boost problem-solving.
- Scent Games: Hide treats in boxes or towels and let them “hunt.”
- Training Bursts: 10-minute sessions to learn new cues and tricks.
- Indoor Agility: Use cones, chairs, and blanket tunnels for obstacle fun.
- Tug & Fetch: In hallways or basements and mind slippery floors.
Cats: Indoor Activities
- Vertical Spaces: Add shelves or cat trees for climbing.
- Hunt & Pounce: Wand toys, laser pointers (end with a real catch like treats).
- Foraging Feeders: Scatter kibble in snuffle mats or puzzle toys.
- Window Watching: Place bird-friendly feeders outside windows for safe viewing.
Routine & Environment
- Maintain a consistent routine: meals, play, rest.
- Use cozy beds away from drafts.
- Add background nature sounds for calming ambience.
Maritime-Friendly Tips
- After storm closures, plan micro-walks when sidewalks are cleared.
- Choose grippy booties for dogs to prevent slips.
- Keep salt off paws: wipe after outdoor exposure; use pet-safe de-icers.
Explore puzzle toys, snuffle mats, interactive feeders, booties, and pet-safe de-icers at Feeds’n Needs – your local partner for winter pet wellness.
